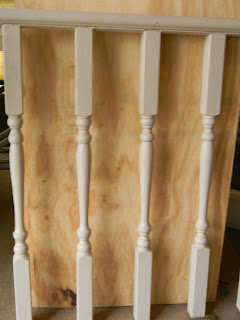
This is what I started with. I pulled one of the spindles off. Then, I cut off an inch or two off the bottom and top. Remember, these came from a scrap pile. Depending on where you get the spindle, you may not want or need to remove any of it.
I used a hole saw to cut out two circles.
I sanded the edges.
I also cut a board for the base, and sanded it. It was about 10 inches long, but there is no set size that it has to be. As far as sanding, that is a personal preference. It depends on what you are going to do with it. If I were planning on selling one of these, I would sand it much more than I did this one. I would also seal the wood in some way before I would paint it.
I measured the board for the center,then marked where the spindle will go. I used a paddle bit, and drilled holes for the dowel rods that will hold the stand upright when inserted in the ground.
I drilled two pilot holes in the base and spindle. I then attached the spindle to the base with two screws through the bottom of the base,into the spindle.
On one of the circles, I used paddle bit to hollow out the middle a bit for the head of the carriage bolt. I used the smallest one that I had available. It is actually longer than what is necessary. You need a carriage bolt that can go through the two pieces of wood that you use, and still get the nut on the bolt. So it depends on the wood you use.
I centered the circle on the top of the spindle, and drilled one pilot hole. It's hard to line things up unless you still happen to have your prehensile tail. So, I drilled the screw into the pilot hole in the circle,just until I could see it. That let me line it up with the pilot hole in the spindle. After I drilled that screw through, into the spindle,then I drilled the next pilot hole. Then,added one more screw.
Here is the first circle attached to the spindle. The carriage bolt is sticking up, and the basket can be attached.
The second circle is slid down over the carriage bolt. It pins the basket between the pieces, and holds it securely. Add a washer, and nut. Tighten.
Now, the stand is ready to paint. Depending on your plans for it, you may want to seal it, then paint it. You may need to straighten the basket a bit. I forgot to do that before I took the picture.
For the paint, I used this new paint that I found at Lowe's. I love this stuff! Gorgeous colors, and easy to use. (and they didn't pay me to say this,either)
This is the completed spindle plant stand. Add a fiber basket liner, and plant away. I put mine where I want them, then use dowel rods pounded through the base,into the ground. You could also use screws, and attach these to a deck or porch.
Note: Wire plant baskets have a variety of bottoms. This is another type that has a circular opening in the bottom. For this one, I had to make sure the wood circles were bigger than the hole in the bottom.
Then, I attached the second circle as usual.
I really love making things, especially when I can re-use, re-purpose,or re-cycle something that was going to get thrown away, or burned. I'm not a tree-hugger, nor an environmentalist. But, a tree dies to provide wood for us. If you can make something useful from something that was going to be wasted, then do so. Please remember all safety rules when working with sharp objects. I'm not responsible if you bleed on the wood. Also, my results may not be yours. But, if you have problems, contact me. I'll try to help.


No comments:
Post a Comment