Sunday, March 20, 2016

Adventures in Up-cycling-A garden Angel

So I was digging in the neighbor's burn pile again...this time for old porch columns. The neighbor is a re-modeling contractor, so all this stuff comes from demo work,before he re-models whatever customers want done. He cuts the columns in half so they fit in his truck. But, no worries. I can think of plenty of things to do with even just half a column. Here's one of my latest epiphanies.
I made a garden angel out of a half an old porch column, and some scrap wood.
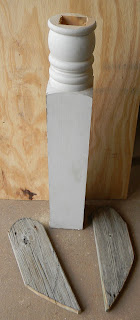
This was the original piece.
I cut the top section off the column, and cut some wings out of old scrap wood.
I sprayed painted the column this lovely shade of pink. It's this new paint that I found at Lowe's, Rust-oleum Inspire Designer Series Paint and Primer, Ultra Matte Soft Blush color. As you can see, I tape off the "face" with painter's tape.
I love these paints. 
I made a color wash(little bit of paint,lots of water,mixed together) with this paint that I got at Michael's.(They have SOOO MUCH new stuff there right now,damn their hides!) The paint is Craftsmart Multi-surface Premium Chalky Acrylic Paint, French Teal color. I brushed it on, then wiped it off some here and there.
Yes, I get seduced by paint colors.
The wood for the wings had a lot of cracks. After all, it was in the burn pile! In order to make sure the wings wouldn't crack in two, I finally found a use for this roll of embossed metal that I picked up from a craft store sometime in the past. I don't always know what I'm going do with some of the items that I find, but I always know that when the time is right,all will be revealed. Now if only I could convince my husband of that. I digress. (ADHD-oh,a butterfly!) Back to the wings, I used my air stapler to attach the metal bands the whole way around the wings. I used a small grapevine wreath for the "halo". I put a few staples in, but not the whole way, around the "halo" area. Then, I used wire put through the staples to hold the grapevine "halo" on. I cut a piece a scrap board to attach the "angel" to, and just used some long screws,along with some Liquid Nail, for the base.
I made a metal bow for the front,attached with staples. The flower is a metal flower that I found at Michael's, Studio Decor Vintage Blush Rose Antique. It was a magnet, so I didn't even need to figure out how to secure it to the metal bow. That sucker holds on good! The column that I made this from has a hole down through the middle. A small flower pot can sit down in it. In my head, I envision a pot of golden yellow Wave Petunias cascading down, as the angel's hair. But, it's March. It's still cold...sometimes. No petunias yet. So, I used silk flowers for the moment. I wish everyone had a neighbor with a great burn pile, so you could make this, but if you don't, check architectural salvage stores. They are popping up in many cities these days. Or,you can make it from new stuff. Let me know if you try this. I'd love to hear your story.


I also have a Facebook page, An Artisan Touch, where you can see more pictures of other projects.

Saturday, March 19, 2016

Adventures in Up-cycling-Spindle Plant Stand

This is actually a journey through two fronts. I made a plant stand from several re-purposed items, for my garden. Remember that neighbor's burn pile that I keep digging in? Well, he had several sections of porch railing, so I grabbed them. At Christmas, I used some to make ornaments. I'll make sure to post about them one of these days. Today, I used them to make plant stands. Yes, I'm nuts. Yes, I'm a junker queen. I just hate to see things go to waste, when they can still be used. And, I was unemployed for a long time. I had to make do, or do without. Let me tell you, I have making do down to a science.
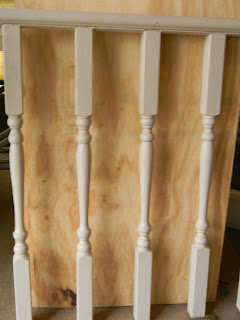
This is what I started with. I pulled one of the spindles off. Then, I cut off an inch or two off the bottom and top. Remember, these came from a scrap pile. Depending on where you get the spindle, you may not want or need to remove any of it.
I used a hole saw to cut out two circles. 
I sanded the edges. 
I also cut a board for the base, and sanded it. It was about 10 inches long, but there is no set size that it has to be. As far as sanding, that is a personal preference. It depends on what you are going to do with it. If I were planning on selling one of these, I would sand it much more than I did this one. I would also seal the wood in some way before I would paint it. 
I measured the board for the center,then marked where the spindle will go. I used a paddle bit, and drilled holes for the dowel rods that will hold the stand upright when inserted in the ground.
I drilled two pilot holes in the base and spindle. I then attached the spindle to the base with two screws through the bottom of the base,into the spindle.
On one of the circles, I used  paddle bit to hollow out the middle a bit for the head of the carriage bolt. I used the smallest one that I had available. It is actually longer than what is necessary. You need a carriage bolt that can go through the two pieces of wood that you use, and still get the nut on the bolt. So it depends on the wood you use. 
I centered the circle on the top of the spindle, and drilled one pilot hole. It's hard to line things up unless you still happen to have your prehensile tail. So, I drilled the screw into the pilot hole in the circle,just until I could see it. That let me line it up with the pilot hole in the spindle. After I drilled that screw through, into the spindle,then I drilled the next pilot hole. Then,added one more screw.
Here is the first circle attached to the spindle. The carriage bolt is sticking up, and the basket can be attached.
The second circle is slid down over the carriage bolt. It pins the basket between the pieces, and holds it securely. Add a washer, and nut. Tighten.
Now, the stand is ready to paint. Depending on your plans for it, you may want to seal it, then paint it. You may need to straighten the basket a bit. I forgot to do that before I took the picture.
For the paint, I used this new paint that I found at Lowe's. I love this stuff! Gorgeous colors, and easy to use. (and they didn't pay me to say this,either)
This is the completed spindle plant stand. Add a fiber basket liner, and plant away. I put mine where I want them, then use dowel rods pounded through the base,into the ground. You could also use screws, and attach these to a deck or porch. 
Note: Wire plant baskets have a variety of bottoms. This is another type that has a circular opening in the bottom. For this one, I had to make sure the wood circles were bigger than the hole in the bottom.
Then, I attached the second circle as usual. 

I really love making things, especially when I can re-use, re-purpose,or re-cycle something that was going to get thrown away, or burned. I'm not a tree-hugger, nor an environmentalist. But, a tree dies to provide wood for us. If you can make something useful from something that was going to be wasted, then do so. Please remember all safety rules when working with sharp objects. I'm not responsible if you bleed on the wood. Also, my results may not be yours. But, if you have problems, contact me. I'll try to help. 

Friday, March 18, 2016

Adventures in Gardening-In the beginning

One of my latest journeys have been in gardening. We bought a house,our first, in July of 2014. So,last summer, I started work on a garden. The yard was pretty much undeveloped. After the first shovelful, I understood why the previous owners may not have wanted to plant much. Our soil is miserable red clay. But,after much blood,sweat,and tears(heavy on the sweat),the garden was established.
Before

I wanted a potager garden. I wandered through Pinterest land, pinning many,many pictures of potagers around the world. I laid out the beds. This is where the "tears" part of "blood,sweat,and tears" came into play.(math is NOT one of my strengths) I was also unemployed(and broke) last summer, so I had to get creative with the materials that I used. I wove the wattle for the raised beds from the prunings of apple trees. I knew a lady whose family have an apple orchard. I asked if I could collect the prunings in the spring.
They didn't come out too bad.
And this made all that "blood,sweat,and tears" worthwhile.
And this is what it looked like at the end of last summer.
Spring is finally here,now.And it's time to start a new adventure in the garden. And for all the meteorologists calling for snow on Sunday,the first day of Spring, you can kiss my.....It's Spring,damn it!


Adventures with Gourds-Random Tenerife


Many people that work with gourds find one type of medium that they become specialists in. Jenn Avery, a member of the Pennsylvania Gourd Society,is one of the top pyrography artists working with gourds. Susie Nonn and Marianne Barnes combine basket weaving and gourds in amazing ways. Phyllis Sickles' carved gourds are true works of art. As for me....remember that ADHD? I'm pretty sure my name will never be synonymous with a particular technique. Forever on a journey, with no destination, I keep finding new things to try. So,when I saw pictures from fiber artists,I had to try something like that on a gourd. It took quite a bit of work to figure out a method to attach the stone donut,and keep it evenly spaced within the thread framework. If you want to try it,click here for the full tutorial. And if you come up with an easier way to attach the stone donut, PLEASE let me know!


Adventures with Gourds-Using texture medium

As is typical of a person with ADHD, I have many interests and hobbies. Okay, so some refer to it as having the attention span of a flea. That doesn't make me a BAAAD person. (yes,I listened to KIX in my misspent youth) The beauty of having a wandering mind is when I can link some of these hobbies and interests together. This is a good example. I used to be a cake decorator years ago. Then,when I became interested in gourds, I found a way to use what I already knew,in a different medium. I found this stuff at the craft store called texture medium. It looked just like cake icing. So, I broke out the old decorating bags, and used a technique called "brush embroidery" on cakes,except on a gourd instead. Click here for the complete tutorial.


Saturday, February 6, 2016

Adventures in Up-cycling: An entertainment center

This adventure started like so many of mine. I was unemployed, broke, and Christmas was coming. Being short on cash, long on craft supplies, and a Pinterest addict, I decided to make my grandkids a bakery stand. I bought them an EasyBake oven for their present, and saw some really neat ideas for a "play bakery" on Pinterest. I'd love to link to some of those sites, but I'm a technological moron. I only know the basics to even do this blog. Hopefully, I'll run across a 10 year old to help me figure things out. I have more pictures on my Facebook page, An Artisan Touch, so feel free to go there to see more.

This was an old entertainment center that we put in the shed when we moved last year. It was old, and beat up, but I thought it might have a use some day. Yes, I might be a hoarder.
I cut the top off, added slats for shelves, and nailed plywood on one side to make the front of the stand. Now, I think I already mentioned broke, and being a hoarder. I also dumpster-dive, or in this case, burn-pile-dive. One of my neighbors is a contractor that does remodeling. He throws the stuff that he demos from his jobs onto his burn pile. Well...I occasionally, with his permission, drag stuff home. Hey, it's still good! I can use that!(My husband cringes when he hears me say that.) So, I had to fit 2 pieces of plywood together because I didn't have any big enough.

He also had some nice molding in that pile. It works nicely to finish off the edges.
After piecing everything together from the scraps that I acquired, I painted it. Note: when I was putting it together, I used an air compressor and brad nailer. I may be stingy about materials, but good tools are necessary to my life. I've acquired many over the years. Treat them right, and they'll treat you right, for many years.
Love this color!! Valspar Paint and Primer for Metal, Wood, and Plastic: Thistle Field.
Now that the main piece was painted, it was time for the trimmings. I found several sections of porch railing in the neighbor's burn pile. Then, I bought several wooden scroll frames at Michael's Craft Store. I sprayed them with this gorgeous Valspar paint.I use this brand a lot because it has excellent coverage. It sprays so nicely, and is easy to use. Note: I am not being paid to say this. (yet?)
This is the interior. I added shelves, making sure that the EasyBake oven could fit on one of the shelves. I wanted to get the grands an EasyBake oven because I had one as a kid. I was a cake decorator/baker for 11 years before leaving that field to start an apprenticeship as a skilled construction trade technician.(I know. Cakes to construction is a little weird. I'll get to that adventure one of these days.) I wanted to introduce the grandkids to the item that started me on one of my early adventures, and share what I have learned with them.
Finally finished, with hours to spare,on Christmas Eve! I sewed the canopy with the sewing machine that my husband and son gave me as an early Christmas present. Now, I don't really know how to sew,yet. And, I don't recommend that one's first sewing project should be trying to sew bias tape on scallops,especially if one has never sewn a seam before. The cake plate on the bottom shelf is made from a candle holder, and plastic serving plate that I bought at the Dollar Tree. I glued them together with E6000, and spray-painted the whole thing with another of the Valspar paints that I had. I bought doilies,and serving trays for any baked goods that the kids would eventually make. 

A few weeks after Christmas, knowing that the kids would use up all the EasyBake mixes, I decided to start making the kids some felt "play baked goods". I saw some really cool examples on Pinterest.(I did mention that I was a Pinterest addict?) Once again, if I weren't such a technological moron, I would link to those sites. (Damn it, where's that 10 year old?)

So ends The Adventure of the Up-cycled Entertainment Center. Hope you enjoyed your trip with An ADHD Artisan!


The adventure begins

"The creative person wants to be a know-it-all. He wants to know about all kinds of things: ancient history, nineteenth-century mathematics, current manufacturing techniques, flower arranging, and hog futures. Because he never knows when these ideas might come together to form a new idea. It may happen six minutes later or six months, or six years down the road. But he has faith that it will happen."
— Carl Ally


Do you have 100 projects started, and just have to start 1 more? Do people say,"How do you have time for everything?" to you when you talk about your latest project? Do people call you a know-it-all because you always have some knowledge of just about any topic someone starts talking about? Do you usually know more about that subject than the person that calls you a know-it-all? Does your family think you are nuts? If so, you came to the right place.

I like to try (too)many things. Then, I like to share what I've learned. Not to make someone else feel stupid, or piss them off. I want to share because knowledge and creativity are built from many experiences. Mine,yours,and theirs. You take what I know, and add what you know, and then...wham! So many possibilities, so much creation, all because we built ideas on top of ideas.

So,join me on an adventure. Let's see where it takes us. And remember, in my world, you don't have to hide your crazy.